Japanese Strawberry Shortcake
Moist, airy, and light, Japanese Strawberry Shortcake is among the most popular cakes in Japan. This elegant and classic dessert is perfect for any celebration. Here, I share how to keep the sponge cake moist and decorate it with berries and fresh whipped cream.
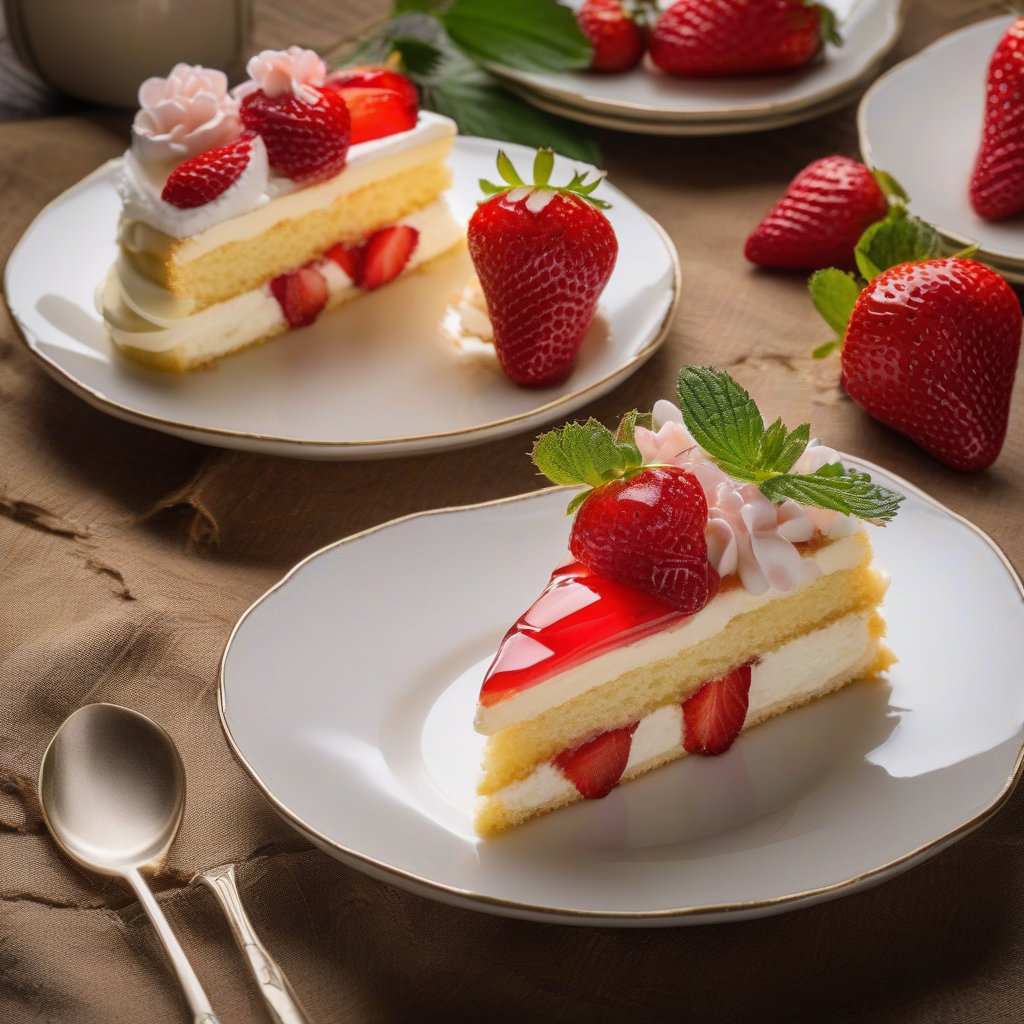 Foto: Just One Cookbook
Ingredients
- 1 Tbsp butter ((for greasing the pan; or use shortening or cooking spray))
- 3 Tbsp unsalted butter
- 2 Tbsp whole milk ((use whole milk for the best results))
- 4 large eggs (50 g w/o shell)
- ½ cup sugar ((½ cup + 2 Tbsp, to be precise))
- 1 cup cake flour
- 2 Tbsp water
- 3 Tbsp sugar
- 1 Tbsp liquor of your choice ((optional; I like orange liqueurs like Grand Marnier or Cointreau))
- 2 cups heavy (whipping) cream ((36% fat; must be at least 30–35% fat))
- 3 Tbsp sugar
- 1 lb strawberries
- 10 blueberries
- 2 sprigs mint leaves
Steps
Gather all the ingredients. I highly encourage you to weigh your ingredients using a kitchen scale for this recipe. Click on the “Metric“ button at the top of the recipe to convert the ingredient measurements to metric. If you‘re using a cup measurement, please follow the “fluff and sprinkle“ method: Fluff your flour with a spoon, sprinkle the flour into your measuring cup, and level it off. Otherwise, you may scoop more flour than you need.
Make sure the eggs and butter are at room temperature. Sift the cake flour at least twice.
Place an 8-inch (20-cm) cake pan on top of parchment paper, trace around the pan, and cut out 1 circle. Grease one side of the parchment paper and both the bottom and sides of 1 cake pan with 1 Tbsp butter. Then fit the parchment paper in the cake pan, greased side up. I avoid parchment paper on the sides because sometimes it pulls the batter and affects the final result of the cake.
Preheat your oven to 350ºF (180ºC). For a convection oven, reduce cooking temperature by 25ºF (15ºC). It’s always better to preheat longer, preferably 15–20 minutes extra. Nami's Tip: You preheat the oven so that all the surfaces inside your oven (walls, floor, door, and racks) are the desired cooking temperature. This makes for an even temperature throughout the oven and you won’t lose as much heat when you open the door for a few seconds. Depending on your oven, preheating might take 10 to 20 minutes.
Prepare a double boiler. If you have never done this before, please see the Notes section below. Turn on the stove’s heat to high and bring the water in the saucepan (Pot A) to a rapid boil. Once boiling, reduce the heat to maintain a steady simmer. Put 3 Tbsp unsalted butter in the small bowl (Bowl #1) and set over the saucepan. Let the butter melt gently.
Once the butter is melted, remove the bowl from the saucepan. Then add 2 Tbsp whole milk and whisk to combine. Set aside to keep it around 104ºF (40ºC). Nami's Tip: I highly recommend using whole milk instead of reduced-fat milk. I’ve tried using both and concluded that whole-fat milk makes a difference in the final result.
In a stand mixer bowl (Bowl #2), add 4 large eggs (50 g w/o shell) and break the egg yolks and whites with your whisk.
Add ½ cup sugar (½ cup + 2 Tbsp, to be precise) and whisk to combine.
In a large pot (Pot B), bring about 2 inches of water to 140ºF (60ºC) and maintain the temperature. Then, set the stand mixer bowl (Bowl #2) directly over the pot and whisk constantly so the eggs don’t scramble. This is called a bain-marie or water bath, where you set the bowl of food directly over a larger container of simmering water to temper the heat for gentle, even cooking. You can also use the double boiler method, where you set the egg mixture bowl (Bowl #2) over Pot B. The bowl doesn’t touch the simmering water of the pot.
Whisk until the temperature of the egg mixture reaches 104ºF (40ºC). Remove Bowl #2 from Pot B and set it up on the stand mixer with the whisk attachment.
Whisk on high speed (Speed 10) until the mixture is fluffy, for about 2 minutes. The batter should be loose yet thick and glossy.
When the batter is pale, fluffy, and tripled in volume, reduce the speed to low (Speed 4) for several seconds. Stop the mixer and lift some of the batter with the whisk to check the consistency. If the batter falls off your whisk in a solid line or ribbon on top of the mixture, you’ve reached the “ribbon stage” (see Notes). Remove the bowl from the stand mixer.
Add half of the 1 cup cake flour to the bowl. Using the whisk, fold gently but thoroughly. Do this by rotating your bowl slowly while simultaneously moving your whisk in a down-and-over motion.
Add the rest of the flour and fold gently to make sure all the flour is incorporated quickly so your mixture doesn’t deflate.
With your spatula, take out one scoop of the batter from the bowl and add it to the butter and milk mixture. Nami's Tip: If we add the butter and milk mixture into the entire cake batter, the fat in the butter will deflate the batter.
Incorporate the butter and milk mixture into a small amount of the batter first before adding it to the entire cake batter.
Add the mixture back into the cake batter by pouring it over a silicone spatula. This prevents the mixture from deflating the batter and helps disperse the mixture. Gently fold until incorporated. When you lift the spatula, the batter should fall like a ribbon.
Pour the batter into the center of the cake pan, from right above the cake pan. You want to avoid introducing extra air into the batter at this point. Collect the leftover batter in the bowl and pour it around the edges of the cake pan, not the center.
Firmly tap the cake pan on the counter to release air bubbles in the batter.
In the preheated oven, bake at 350ºF (180ºC) for 20–25 minutes. Check if the sponge cake is done by inserting a skewer in the middle; if it comes out clean, the cake is ready. While the cake is baking, start preparations for the cake assembly (see below).
As soon as you take out the cake pan from the oven, drop it on the counter to “shock” the cake so it stops shrinking. Separate the cake from the pan by running a sharp knife or offset spatula around the sides.
Take the cake out of the pan by placing the wire rack on top and flipping the cake over onto the rack.
Immediately remove the parchment paper.
Place another wire rack on top and flip it back over. The top of the cake is now facing up.
Cover the cake with a damp towel until cooled to keep moisture in the cake. Make sure the towel is thin (not heavy) and wring the water out well so that the towel is damp, not wet. If you keep the sponge cake for later use, wrap it with plastic wrap after it‘s completely cooled and keep it in the fridge (see Notes). Nami's Tip: You can make the sponge cake the day before. It actually tastes better and it's easier to slice the cake in half.
While the cake is baking, divide 1 lb strawberries into 2 groups, one for the decoration and the other for the filling. Keep the beautiful, same-sized strawberries for the decoration. Remove the husk and clean the strawberries with a damp paper towel (do not wash, as we don’t want the strawberries to be moist and become moldy). Slice off the core for all the strawberries.
For the strawberries that we will use for the decoration, cut them in half lengthwise. For the strawberries that we will use for filling, slice them lengthwise into ¼-inch (5 mm) slices.
To make the syrup, combine 2 Tbsp water, 3 Tbsp sugar, and 1 Tbsp liquor of your choice (optional) in a small bowl (Bowl #3). Microwave for 1 minute to dissolve the sugar.
While the cake is cooling, prepare an ice bath by placing ice cubes and water in a large bowl (Bowl #4). Place a clean and dry mixing bowl (Bowl #2) in the ice bath and add 2 cups heavy (whipping) cream and 3 Tbsp sugar to keep it cold for 10–15 minutes. Nami's Tip: When everything is cold, the fat in the cream stays firm and traps air easily, helping the cream whip smoothly without separating.For the perfect sweetness, the sugar should be 8% of the heavy cream weight.
Transfer the mixing bowl to the stand mixer and whisk on low speed for 1 minute. Increase to medium speed for 1–2 minutes, until the cream thickens slightly and faint lines remain on the surface.Increase to medium-high speed and whisk for about 30 seconds, watching closely. When the cream looks thicker and fuller and lines remain on the surface, stop the mixer. The cream should reach soft-peaks. When you lift the whisk, the peaks should stand up but gently bend at the tip. The cream should look smooth and glossy, not dull or grainy (over whipped). When scooped, it should hold its shape without spreading. This texture is ideal for cake decorating or serving alongside desserts. Nami's Tip: Stop a little early. If the cream feels too soft, whisk again in short 10-second intervals until it reaches the right consistency.
With a serrated knife, slice the cooled cake horizontally into half to make 2 layers (top and bottom).
Place the bottom of the cake on the cake circle. Brush the syrup on the top and sides of the bottom layer. This will help the sponge cake stay moist.
Using a hand whisk, whisk only the cream at one spot by the edge of the bowl instead of whisking the entire bowl of cream. We will make the whipped cream as we need it. With this approach, we can also control the stiffness of the whipped cream.
When the cream at the edge of the bowl reaches medium peaks, transfer it to the top of the bottom cake layer. Medium peaks mean when you lift the whisk, the cream will hold its shape, but the tip of the peaks will fold back on itself.
Spread the whipped cream evenly. If you don’t have enough whipped cream, whip more and add it onto the cake.
Place the sliced strawberries on top of the whipped cream as you see in the pictures. Keep the center area open by not covering it with strawberries. This will make it easier to cut the cake into slices.
Whip the cream again at the edge of the bowl.
Transfer the whipped cream to the top of the strawberry layer. Spread just enough cream to cover the strawberries; do not add too much.
Place the top layer of the sponge cake over the bottom layer. Brush the syrup on the top and sides of the sponge cake.
Whip more cream and place it on top of the cake.
Place the tip of the offset spatula in the center of the cake at a 30-degree angle and turn the cake turntable toward you to create a smooth top. Lightly coat the sides of the cake with a thin layer of whipped cream.
Now add more cream to the sides, little by little. Place the offset spatula at a 90-degree angle and push the turntable away from you.
Remove the excess cream from the cake and put it back into the bowl.
For a basic decoration, I use a Wilton 2A decorating tip. Put the tip in the piping bag and cut off the tip so the metal will show from the bag. Fold the top half of the bag outward as you see in the picture (over your hands).
Whip the cream to stiff peaks. When you lift the whisk, the peaks will hold firm. Put the cream into the piping bag. Once you fill the bag halfway, lift up the top half of the bag and push the cream down toward the tip.
Squeeze the piping bag to test to make sure the cream comes out smoothly. When you’re ready, hold the piping bag at a 90-degree angle and squeeze about a 1-inch-wide ring of whipped cream around the top edge of the cake. This will be the base for the strawberries.
Decorate and place the strawberries cut-side down on top of the whipped cream. Then squeeze small dollops of whipped cream between and around all the strawberries. Place 10 blueberries between the whipped cream dollops. Place 2 sprigs mint leaves as desired to add color.
I recommend putting the cake on a cake stand with a dome or in a cake box to keep the cake shape while preventing it from drying. Keep the cake in the refrigerator and enjoy it within 2 days.


Loading comments...