Resurrection Rolls
Empty Tomb Rolls (or Resurrection Rolls) are the perfect Easter recipe! Wrap a marshmallow (dipped in butter and cinnamon sugar) with crescent roll dough and bake. But when you bite into it, the marshmallow is gone (it melts into caramel-ly mallow goodness.) An empty roll, to symbolize the empty ...
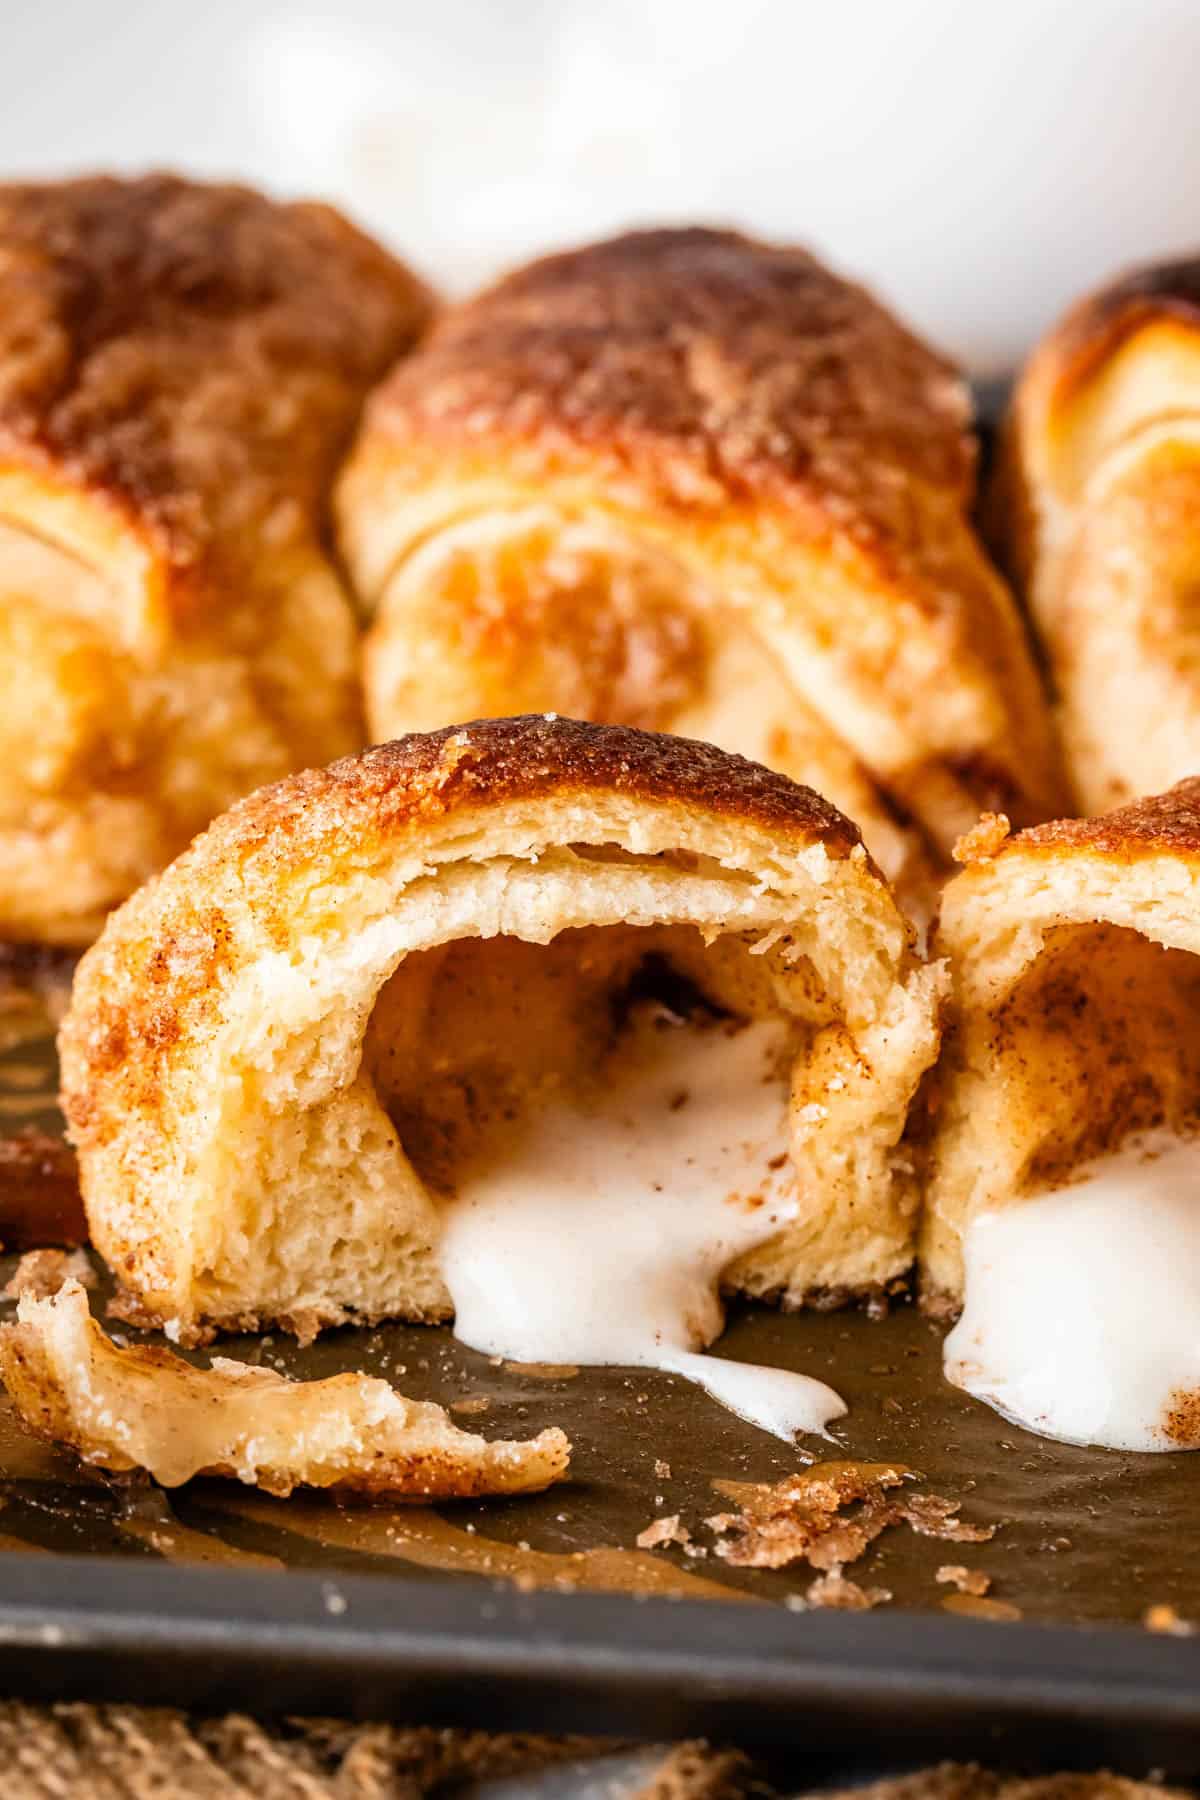 Foto: The Food Charlatan — The Food Charlatan
Ingredients
- 1 tablespoon active dry yeast
- 2 tablespoons water (warm, not hot)
- 1/4 cup granulated sugar
- 3/4 cup whole milk (warm, not hot)
- 1/4 cup butter (1/2 stick)
- 1 teaspoons kosher salt (if you are using table salt, use 3/4 teaspoon)
- 1 large egg
- 2 and 3/4 cups all purpose flour (divided)
- 1/2 cup butter (melted)
- 1 cup granulated sugar
- 1 tablespoon cinnamon
- 12 large marshmallows
Steps
Make the dough: In a large bowl or stand mixer, combine 1 tablespoon yeast and 2 tablespoons warm water. Touch the water with your wrist. It should feel like lukewarm bath water, about 105 degrees F. (Do not use HOT water, it will kill your yeast!)
Proof the yeast. Let the water and yeast sit for about 5 minutes. Check to make sure it's getting bubbly and foamy. See photos! (If not, you've killed your yeast with too hot water. Dump it and start over!)
Add 1/4 cup granulated sugar to the yeast and water mixture.
In a glass measuring cup, add 3/4 cups whole milk and 1/4 cup (1/2 stick) of butter. Warm in the microwave in 30 second intervals until the milk is warm (not hot!) It should be about the same temperature as the water. The butter will not melt completely, but will be soft enough to stir in. If you heat it up too much, no problem, stick it in the fridge or freezer until it is baby-bath warm. Don't add it to the yeast when it's hot.
Add the warm milk and butter to the yeast and sugar.
Add 1 teaspoon kosher salt.
Add 1 large egg.
Add 1 cup of the flour. Measure your flour correctly: use a spoon to add flour to the 1 cup measurement, then level it off. Stir it all together with a rubber spatula.
At this point, if you are using a stand mixer, switch to stirring with the dough hook attachment. (If you are making this by hand, use a sturdy wooden spoon to stir in the flour.)
Add the remaining 1 and 3/4 cups flour, 1 scoop at a time, stirring thoroughly after each amount of flour is added. Use a spoon to add flour to each cup measurement, then level it off. The dough will be very loose and sticky. You can add a little bit more flour, but don't go much over 2 and 3/4 cup flour total. This dough is not going to form a ball as it mixes, as you may have seen with other recipes. See photos for guidance.
Knead the dough for 5 minutes, until is has come together a little bit. It will still be sticking to the sides of the bowl a bit.
Prepare the dough for rising. Scrape down the edges of the bowl with a spatula, shape the dough so that it is slightly rounded on top, and spray the heck out of the top with nonstick spray. Spray the edges of the bowl all the way to the top. Spray one side of a sheet of plastic wrap and cover the bowl.
Let the dough rise in a warm spot for at least 1 hour, until doubled in size. It might take a few minutes longer if your kitchen is cold. (Stick it on top of the fridge! Or see note to make a homemade "proofing box"*)
Prepare a baking sheet with silicone baking mats or parchment paper, or spray well with nonstick spray.
Use a rubber spatula to scrape the dough onto a very well floured work surface. (I love to use my pastry cloth).
Use a serrated knife or bench scraper to divide the dough into 2 equal pieces. Set aside 1 piece on a floured surface and cover with the plastic wrap from the first rise (or a tea towel).
Roll the other piece into a circle that is about 12-13 inches.
Use a pizza cutter or chef's knife to cut the dough (like a pizza) into 6 equal triangles. (see photos)
Prepare the butter, sugar, and mallows. Melt 1/2 cup butter in a small bowl. Add 1 cup granulated sugar and 1 tablespoon cinnamon to another bowl and stir. Open up the bag of marshmallows.
Dip the marshmallows. Dip a few mallows in butter, coating each side. Then roll in the bowl of cinnamon-sugar.
Wrap the marshmallows. Stretch out the skinny end of one triangle of dough with your hands, so it is like a long piece of pizza.
Place a cinnamon-sugar marshmallow on the fat end of the triangle. Fold the corners up over the mallow. Roll the dough and marshmallow into a tight crescent. (see photos) Seal the edges with your fingers if you see any mallow poking through.
Dunk your wrapped roll in the butter. Yup, the whole thing. Tap off the excess.
Roll the buttery dough in cinnamon sugar. (Good luck. I promise, it's worth it. I like to do this assembly line style: dip all the mallows. Then wrap all the mallows in dough. Then keep one hand clean-ish and the other one is going to get buttery and sugar-y as you pass the wrapped dough from the butter to the sugar.)
Place each cinnamon-sugar roll on the prepared baking sheets, seam side down. Continue with rolling out the remaining dough and wrapping up the marshmallows. Place the rolls fairly close to each other, with about 1 inch of space or less between them. The rolls will rise higher if they have other rolls to lean on, forcing them to rise up rather than spreading out.
Cover with plastic wrap sprayed with nonstick spray and let rise at least 30-45 minutes, until about doubled in size. See note to make your own "proofing box."
Preheat the oven to 375 degrees F when your rolls are about half way done with this second rise.
Bake the pan of rolls at 375 for 12-15 minutes.
Test for doneness: You want the tops of the rolls to reach a nice golden brown color. The bottom of each roll should also be golden. If the rolls are browning on top but not browning on the bottom, cover the rolls loosely with foil for the last few minutes of baking.
Cool. Use a spatula to carefully remove the rolls from the pan to a cooling rack within two minutes after taking them out of the oven. The marshmallow gooeyness that has oozed out will start to harden fairly quickly.
Eat them hot! It's fun to use a sharp serrated knife to cut one roll in half, to show the "empty tomb" really clearly.
Storage: Store these rolls covered or in a ziplock, right on the counter. Don't refrigerate them! They will just dry out.
Reheating: To reheat these rolls, preheat the oven to 170 degrees F (Keep warm setting). Place on a baking sheet and warm for 5-10 minutes. Or, microwave individual rolls for 10-15 seconds.
Freezing: You can freeze these rolls in ziplock bags, for up to 3 months. Let thaw in the closed ziplock bag on the counter, and then follow reheating instructions.
Loading comments...