Pearl Couscous Skillet with Tomatoes, Chickpeas, and Feta
Steamy, saucy goodness! This Couscous Skillet is packed with vibrant flavors and freshness. Pearl couscous, tomatoes, chickpeas, spices, kale, and a bunch of fresh herbs and feta on top.
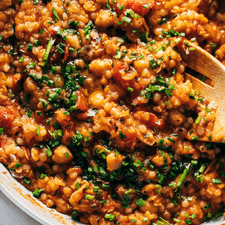 Foto: Pinch of Yum — Lindsay Ostrom
Ingredients
- 2 tablespoons olive oil
- 1 shallot, thinly sliced
- 1/2 teaspoon cumin
- one 14-ounce can chickpeas (drained and rinsed)
- one 14-ounce can diced tomatoes (I like fire-roasted)
- 3/4 cups water or vegetable broth
- 1 teaspoon salt
- 1/2 cup pearl couscous
- 1/4 cup fresh chives, chopped
- 3 -4 tablespoons of mint leaves, chopped (optional, for topping)
- 1/2 cup crumbled feta cheese (optional, for topping)
- 4 -5 stalks kale, stems removed, torn into small bite-sized pieces (can be curly kale or lacinato kale, I use both)
- 3 tablespoons olive oil
- 1 tablespoon red wine vinegar
- 1 tablespoon maple syrup
- salt and pepper to taste
Steps
Add the olive oil to a skillet over medium heat. Add shallots and cumin; sauté until softened, about 5 minutes. Add the chickpeas and mash gently a few times – this is optional but just creates a more interesting texture and helps it get a little bit creamy.
Add the diced canned tomatoes; bring to a simmer.
Add the broth, salt, and couscous; bring to a simmer, then cover and keep on low heat for 6-8 minutes or until the couscous is soft and has absorbed most of the liquid. It should be nice and soft / chewy, like an al dente pasta.
Finish by stirring in chives. Massage the kale with the dressing ingredients in a small bowl for a minute or two, just until tender.
Serve couscous with a little side of the massaged kale. Top individual servings with mint leaves and feta. Creamy, chewy, comforting – it’s so good!
Loading comments...